Using Kentico macros in the visibility fields of your forms is a great way to convert them into progressive forms, but with more complex online forms, this can become quite overwhelming and not easily maintainable.
It would be great if there was a way to predefine a form’s variants upfront, and then display them dynamically on a page whenever needed. This way, you could play around with progressive forms in a more user-friendly manner and even smile!
Therefore, as I promised in my previous blog post, I am going to show you an alternative way of creating progressive forms in Kentico. If you haven’t read the first part of this two-part blog post yet, I highly recommend reading it first as it might answer some of the questions that might arise here.
Anyway, let’s roll our sleeves up and get on with it!
This alternative approach will take advantage of Kentico’s alternative forms and personalization. Both features are interesting enough, but their combination makes them even more exciting.
Let me briefly explain to you what they are about:
- An alternative form is an alternative version of the main form, where any fields of the main form can be hidden if needed. It is kind of extra layer over the main form.
- Personalization creates alternative variants of page elements and displays them only if the contact (visitor) meets the specified condition (e.g., a contact made a purchase in the last 30 days).
So, if we stick to the same example that we used in the first part, we are going to convert the following form (with six fields) into a more intelligent (progressive) form having only four fields (three + one of the bold ones below) at a time:
- First name
- Last name
- Phone number
- Company
- Job title
In our case, we have the main form and need to create four alternative forms out of it in the Forms application on the Alternative forms tab:

Three alternative forms will have four fields. The fourth alternative form, however, will only have three fields and will be displayed when we already know the contact’s phone number, company, or job title. Therefore, alternative forms could have the following fields:
- Email, First name, Last name
- Email, First name, Last name, Phone number
- Email, First name, Last name, Company
- Email, First name, Last name, Job title
When creating alternative forms, you just need to name them and uncheck the fields you don’t want to display. This is how you would create the first alternative form with the three fields:

Once all four alternative forms are created, they can be displayed on a page (using a web part or widget) and leveraged through content personalization. In other words, you would place the main alternative form on a page, and then create three personalization variants out of it, each having different alternative form. Variants are simply clones of the original page element and can be configured differently.
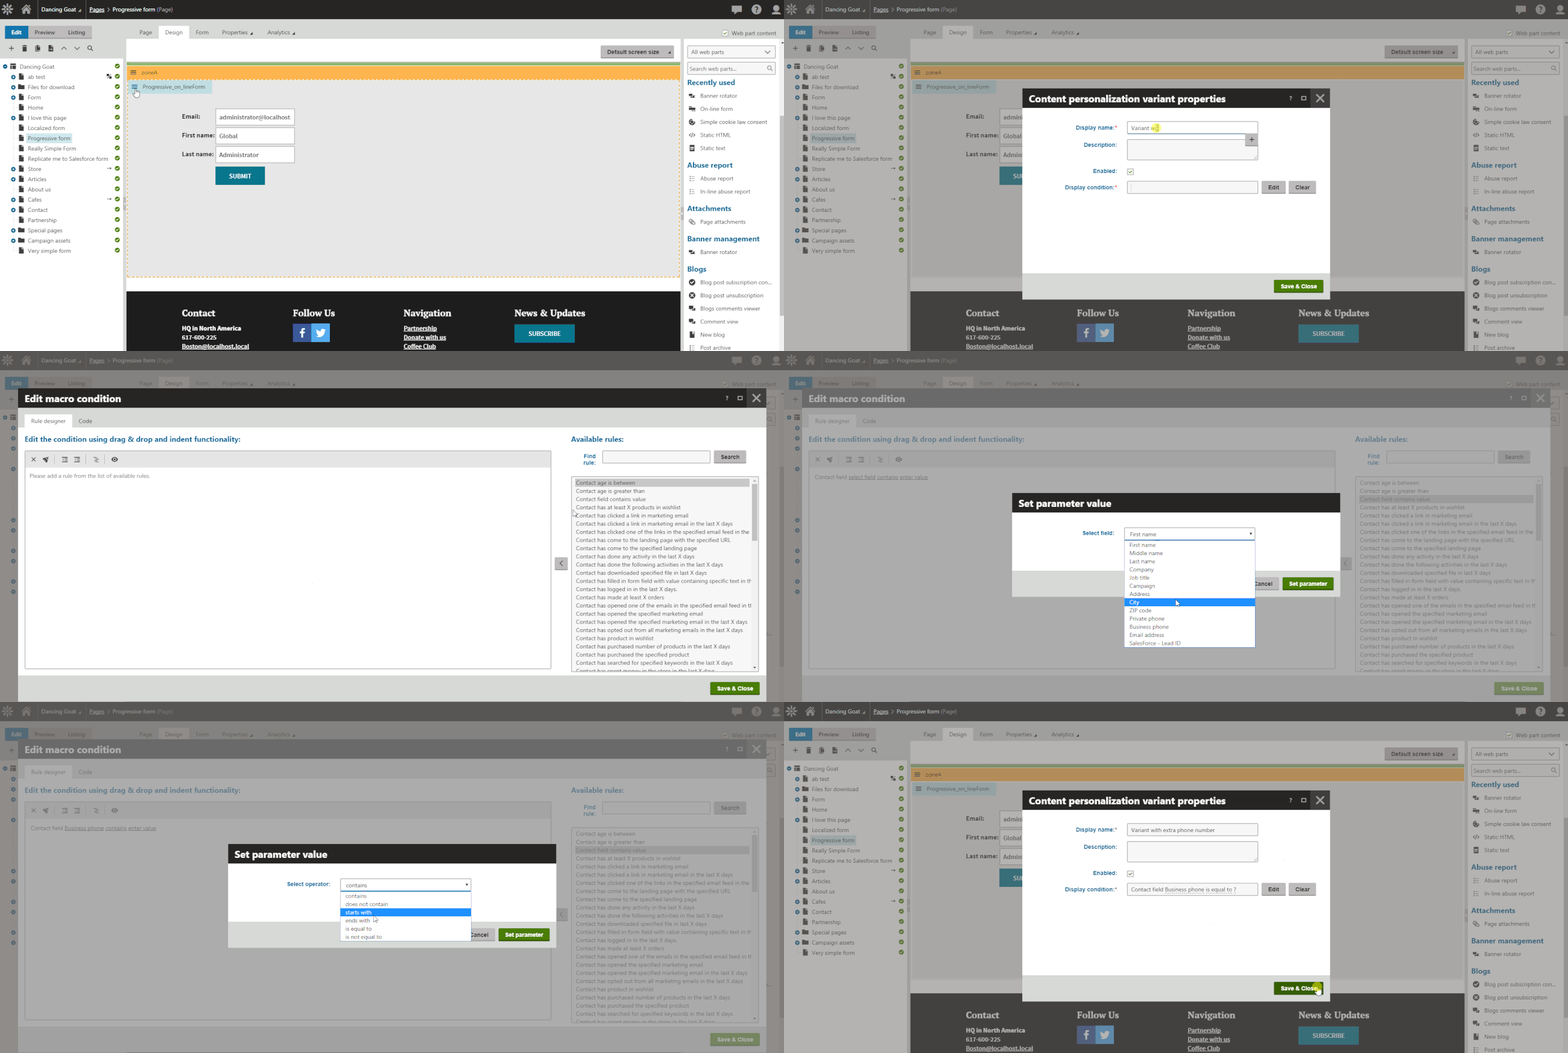
Each personalization variant must have a macro condition that needs to be met otherwise the variant is not displayed. This time, however, we can use built-in macro rules to check on the relevant information and don’t need to create any complex macro conditions! It is so much easier and convenient!
As a macro rule, we would use the one called “Contact field contains value”:

Every personalization variant would just check if the current contact (visitor) has provided us with the corresponding information, and if not, then the relevant variant would be displayed instead of the main alternative form.
The macro rule would be configured in the following way (per each relevant alternative form):
- Contact field Business phone is equal to ?
- Contact field Company is equal to ?
- Contact field Job title is equal to ?
The macro rules above just check if the corresponding contact’s field is empty. If yes, then the variant is displayed.
So, this is how you create the Phone number personalization variant that is displayed only if the visitor’s business phone number is empty:
It’s a piece of cake, isn’t it?
We just need to make sure that each created personalization variant displays the correct (different) alternative form.
For example, the Phone number variant above would display the following alternative form:
.gif)
The last bit (I promise!) is to ensure that the personalization variants are in the right order. Kentico checks the variants from top to bottom and the first variant that meets the macro condition is the one that is displayed (no other variants are checked).
This is a good thing as you can easily define the priority of the variants. In our case, they should be in the following order:

So, if a visitor didn’t provide us with their phone number, the Phone number variant is displayed first. If the phone number is known, then the Company variant is displayed instead. When the company details are known as well, then the Job title variant is displayed instead. And finally, if all of that is known, then the main alternative form (with the three fields) is displayed instead:

Summary
As you can see, progressive forms in Kentico can be great fun if you know how to approach them. It is a puzzle where you need to connect different parts of the system into one working unit. But once done, it works effortlessly.
Which approach do you prefer more? The one with the macros placed in the visible fields of the form, or the alternative forms combined with content personalization? Let us know in comments!first part


